Have postman installed and running
Find installation guide for postman here
Have access to the OpenSRP APIs postman collection url (https://github.com/OpenSRP/opensrp-server-configs/blob/master/assets/postman/OpenSRP.postman_collection.json )
NB - any updates on the postman collection changes the postman collection url
Launch postman (can run on all OS platforms)
Click Import, then Import from the link.
3. Copy and paste the OpenSRP APIs postman collection link (in the field “Enter a url and press Import”)
Go to the OpenSRP collection and click on the 3dots(...), then choose Edit
2. Click on Variables
3. Change the current value of base_url to the base url of your OpenSRP APIs e.g for a sample url “https://anc-stage.smartregister.org/opensrp/security/authenticate” , the base url will be “anc-stage.smartregister.org”
4. Change the current value of username to your OpenSRP API user name
5. Change the current value of password to your OpenSRP API password
You are now fit to run the tests.
Note: replace parts marked with {{}} with the actual values
1. Get OpenID configuration settings from this endpoint
{{keycloak-url}}/auth/realms/master/.well-known/openid-configuration
2. Configure these variables in Postman as described in (2) above.
Variable Name | Configured Value |
|---|---|
keycloak-url | https://localhost:8080 |
realm | name-of-realm-as-defined-in-keycloak |
client-id | opensrp-server |
client-secret | some-random-but-secure-password |
3. In Postman under request Authorization tab, select OAuth 2.0 in the TYPE drop-down. This will make available controls to configure and request for a new OAuth token from the server.
4. Click on Get New Access Token. This will show a form to configure OAuth details. Fill the fields as shown below. Values inside {{}} are parameters as defined in step (2) above.
5. For Auth URL and Access Token URL, replace master in the URL with the name of the realm. See section defined with {{realm}} in the URL
Field | Value |
|---|---|
Token Name | keycloak-bearer-token |
Grant Type | Password Credentials |
Access Token URL | {{keycloak-url}}/auth/realms/{{realm}}/protocol/openid-connect/token |
Username | username-defined-in-keycloak |
Password | user’s-password-as-defined-in-keycloak |
Client ID | {{client-id}} |
Client Secret | {{client-secret}} |
Scope | openid |
Client Authentication | Send client credentials in body |
6. If all values are configured correctly, clicking on Request Token should fetch and display an token in the popup window.
7. Click Use Token to use the new token to access the API.
Proceed to set up the Headers and Body tabs for a request (in the collection), if necessary,
and click SEND to make a request using the Oath2.0 authorization.
*Oauth2.0 Authorization can also be set for each individual request, also under the Authorization tab, for situations where you may a request’s auth to be different from the one set for the collection.
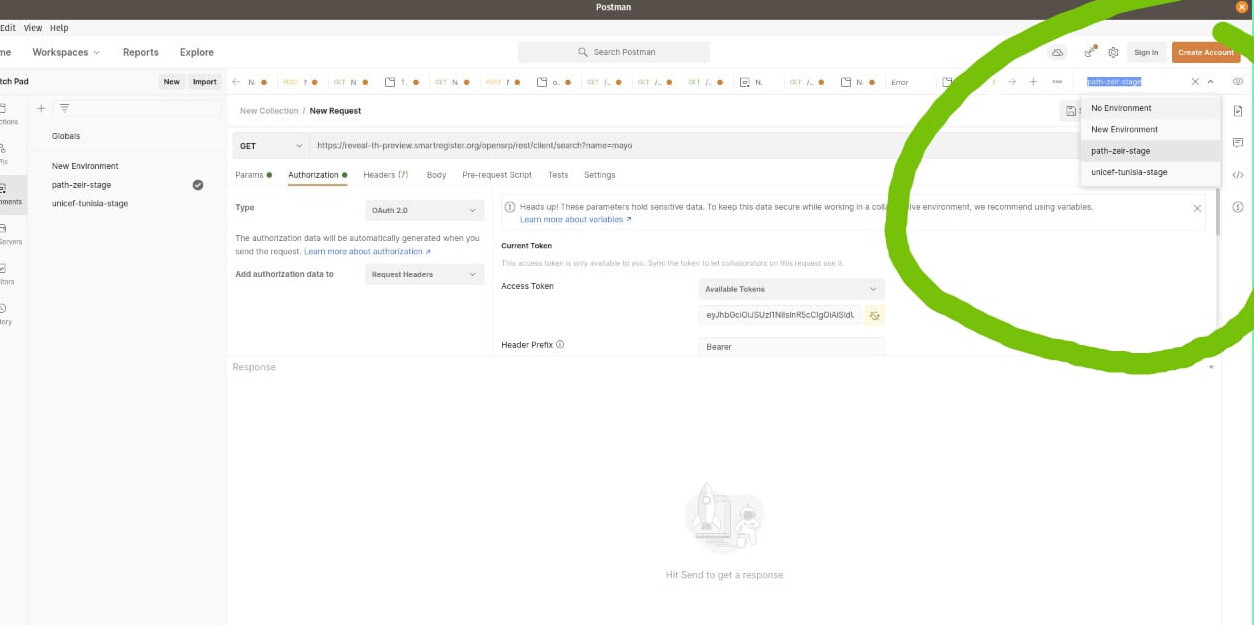
Switching between Environments.
For scenarios where you may be working with multiple servers that share the same collection, you can easily switch between environments variables as described in the diagrams below.
In this case we were initially on the unicef-tunisia-stage, but easily switched to path-zeir-stage


The content by label feature displays related articles automatically, based on labels you choose. To edit options for this feature, select the placeholder below and tap the pencil icon.
|