How to upload Server libraries to Maven/Sonatype
Open SRP Server has multiple maven published jar libraries which should be included in a project's build.
These libraries are:
- opensrp-server-common
Uploading to Maven
All the above projects have the same structure as far as configuration.
To upload files to maven,
- Update the pom.xml file in the root of the project to change the <version> tag. If building for a snapshot, include the word 'SNAPSHOT' in the version name. If building for release DO NOT include the suffix. Thus for a Non-snapshot release, it would read VERSION_NAME=1.0.0
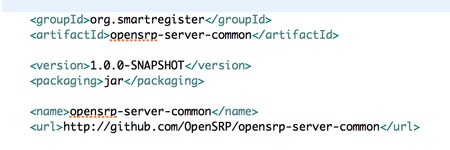
fig.1: example for opensrp server common
- Create a global maven settings.xml file (if it doesn't exist) in ${user.home}/.m2/ folder
- Find the settings.xml structure here
- Update the settings file with your nexus server credentials.
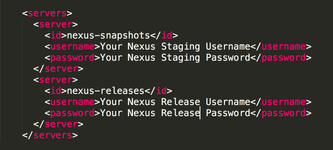
fig.2: example of settings.xml file global setting
- To publish to Maven Local, run the command
mvn clean install
- To publish to Maven Central run the command
mvn clean deployViewing artifacts Maven
To see if the upload was successful you can visit: https://oss.sonatype.org/content/groups/public/org/smartregister/
Using/Including the artifacts in a project
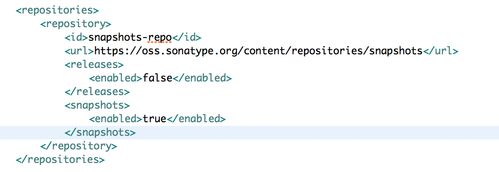
In the projects, pom.xml file, include the sonatype repository if you want to add a snapshot dependency. For release dependency, the central maven repository is added by default.
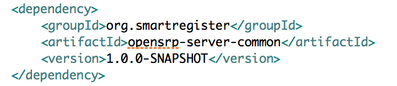
Then add the dependency
Uploading the Release Artifacts to Maven
For Release versions(after the Snapshot is stable and complete), the files must be signed before publishing to maven. This requires access to the signing the artifacts using GPG.
- Install gpg https://gnupg.org/
- Create gpg key
- List the keys and extract the public hash. gpg —list-key
- Upload the key to server gpg --keyserver hkp://keyserver.ubuntu.com --send-keys public_hash
- Update the pom.xml file in the root of the project to change the <version> tag. DO NOT include the suffix 'SNAPSHOT' in the version name.
To stage a release run the following command:
mvn clean deploy -P release
After the release is uploaded to firstly goes to the staging environment on Nexus. To flag the deployment for release so that it's pushed to and is available on Maven Central, you need to login in the nexus interface(Repository Manager) using your sonatypeUsername and sonatypePassword and activate the release from there. Click here for the repository manager link.
Instructions on how to do this can be found here
Versioning Artifacts
Once you have created and tested and artifact on MavenLocal and it works correctly, Its time to upload it to the repo. Step one would be to check the existing latest version for that artifact.
Snapshot Versions
All artifacts for opensrp can be found under https://oss.sonatype.org/content/groups/public/org/smartregister/
e.g for the commonmodule
https://oss.sonatype.org/content/repositories/snapshots/org/smartregister/opensrp-server-common/
Using the MAJOR.MINOR.BUILD system for versioning, when you update the gradle.properties you increment the BUILD value by one. e.g. if the last snapshot for Growth Monitoring was 1.0.1-SNAPSHOT/ you set the VERSION_NAME value to 1.0.2-SNAPSHOT
Release Versions
Once a release version is ready, the MAJOR.MINOR.BUILD value for the very first one starts at 1.0.0. If an update to the release is made the BUILD value is also incremented by one. If a new release is created from a new snapshot (whose versioning will start at 1.1.0 after the release) the next Release Version willl start at 1.1.0.
Major changes in the products will warrant an increment of the MAJOR value which will then increment by one, thus versioning starting at 2.0.0 and following the same format as above for future updates.
Development Hacks
Refreshing dependencies
When refreshing dependencies as you add code changes to the various modules in the org.smartregister package, you need to clear the local maven cache with the following in order the latest changes to reflect... so run
rm -rf ~/.m2/repository/org/smartregister/
Tagging Releases
It is recommended to tag releases and snapshots once you push to maven.
use the syntax , replacing v1.0.0 with the correct version of Snapshot or Release published
git tag -a v1.0.0 -m "Release Version 1.0.0" && git push origin v1.0.0
Closing and Promoting Releases
For Release versions, once you have uploaded the release artifacts using uploadArchives gradle task, you are now ready to push the artifact to the main Maven Repository. This can be done in two ways:
- Using the procedure in the above section Uploading the Release Artifacts to Maven
- By using the gradle task closeAndReleaseRepository right after running uploadArchives
NB: closeAndReleaseRepository task expects only one artifact of the group to be staged as ready for release. If more than one exist, log into nexus and delete one.
You can also combine the uploadArchives and closeAndReleaseRepository task in one line as shown below
./gradlew :<module name>:clean :<module name>:uploadArchives closeAndReleaseRepository -PmavenLocal=false
NB: Before you make a release to Maven Central, make sure there you have not committed any secrets/passwords because Maven Central artefacts cannot be deleted
This site is no longer maintained. Please visit docs.opensrp.io for current documentation.